Maximizing Whisky Yield: Part 2 – Defining the control philosophy and end points

This is the second article about my project to define and optimise the wash production process at a new craft distillery. The first post, covering the differences between beer wort and whisky wash, can be found here.

Why was a new process control method required?

Neither myself not my client had experience of brewing whisky wash at commercial scale, and whilst I had prepared myself by an extensive period of reading and discussions what I found myself with was a fundamental understanding of the biochemistry and a broad-brush overview of the method. What I was missing was practical running details. For example, how to determine the end point of the sparge to consistently yield a wash with the desired gravity (1063). Because a high proportion of strong worts are run off before the sparge (second water) and the temperature of the second water means further sugar formation occurs during the sparge, the reliable calculations one would use for beer wort brewing were not likely to hold. Additionally, because the wort was run off directly into fermenters (FV’s) which did not have the facility for recirculation, it was not easy to get a representative sample of the wash to know it’s gravity either.

What did I devise?

We used the underback as a measuring vessel so that a known number of known volume portions of either strong or weak worts could be run off. Samples of each portion were taken, for the weak worts this was done at the end of each portion and the SG of the portion estimated as the average value between pairs of samples (end of portion N-1 and end of portion N). Since this wort was hot and time was limited, each SG was determined using the density and temperature at point of analysis and a brewing app. algorithm was used to calculate the SG.

I built a spreadsheet to work out the weighted average SG of the combined portions, and during the first few runs we manually mixed the FV and compared the calculated SG to the measured value and found them to be in excellent agreement. This was great news because fully mixing the FV with a hand paddle was hard work.

Once we had three runs worth of data it was clear that this approach was working well. Each complete batch of wash hit the target SG +/- 1 gravity unit. Because we were recording all these data, it was possible to build up a picture of the final SG value of the weak worts run off which would yield the desired 1063 gravity wash.

Now we could go on to optimise the initial mash temperature. With this done, we introduced third water*, which boosted the yield to sugar by a further 7-10%. Once the process conditions were stable it was possible to see that the SG at the desired end point of the sparge (second water) was a consistent value. What I did not expect was that the end point of a fresh water mash and third water mash batch would be the same, but this is what our data showed.

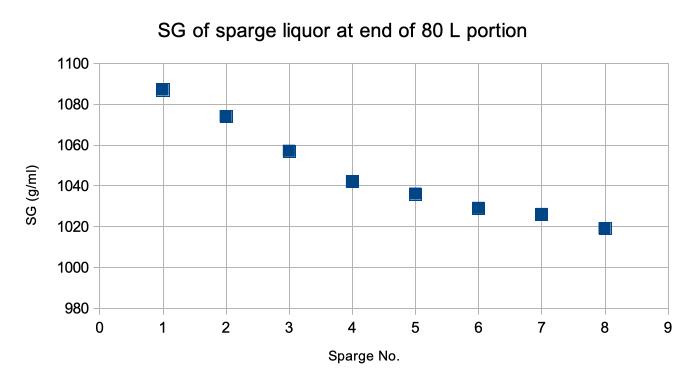
Now we had defined a quick ‘on the hoof’ SG measurement of suitable accuracy and an end point gravity to stop the sparge. No longer did we need to take and analysis lots of samples or use a spreadsheet to calculate our final wash gravity. From the data it was possible to plot an SG vs. sparge volume curve. Because we are running a manually controlled process, with a natural product as our raw material, variations in yield from batch to batch are to be expected. As we moved from the commissioning into production stage we had the understanding to be able to grossly simplified the control philosophy:

1. Check the SG of the strong worts was within the expected range

2. Sparge with a known volume just below the lowest volume we had observed to be required.

3. Check the gravity of the weak worts and compare to the sparge / SG curve and from this estimate how much more sparge water would be required.

4. As we got very close to this volume we could check the weak wort SG vs our desired end point, and stop when we reached this.

5. Seal off the FV and prepare for the collection of third water.*

How well did this work?

We now see wash batches within +/- 2 gravity unit of target each time.

The yield to sugar is > 95% for fresh water batches

The yield to sugar for third water batches is 98-110% (counting the input as just the fresh malt)

My contacts in the distilling industry informed me that a brewhouse yield (yield from malt potential to sugar) should be expected to be > 95% so we were very happy with the above results. It was then time to introduce some minor mechanical changes to the plant to reduce the process time. As I explained in the first post it is important to transfer and cool the hot wash quickly to preserve the limit-dextrinase. At the start of my input we ran a forced fermentation test which showed that it was the wort composition which was the reason the early fermentations were not running to completion. Thus, during this initial phase we were, at my advice, adding an exogenous enzyme to the FV to ensure full fermentation to a gravity of 996-1000. The mechanical changes which I implemented, speeding up the wort transfer, are the subject of my next article.

What now?

Would you like someone to help you optimise or start the operation of a new whisky / grain spirit / beer brewing process? If you are based in the North of England I’d be delighted to come and meet you to see if I can add value. Give me a call.

*Third water is an extra hot sparge (85-89 C) to recover any residual sugars from the spent grist. This in turn is used as the mash liquor for the following batch. For more details of this, see my first post.

Maximizing Whisky Yield: Part 1 – Key Differences and Optimization in Wash Production

This is the first in a series of three posts detailing how I worked with a new English whisky distillery to define and optimise their wash production.

Background

In November 2023 I was called by a new craft whisky distillery to help them with two distinct processing problems: stuck mashes and incomplete fermentations. However this soon grew into a project to optimise the yield of their wort production.

PXL_20231208_141206513

Structure

This first post explores the key differences between wort production for beer and wash production for whisky. Both are sugar solutions derived from malted barley but understanding the key differences between the two methods is vital to the quality of the end product.

The second post covers how I defined the process control parameters from scratch using ‘on the hoof’ experimentation on the live process (a skill I developed working in a production based tech support roles in the chemical industry).

The final post (link to follow) looks at changes we implemented in the brewing equipment. What I arrived on the project the brew kit had already been installed, but some minor low cost changes have significantly reduced the process time, which in turn have positively impacted both quality and yield.

Part 1 – What are the key differences between wort (beer) and wash (whisky) production?

Why are the processes different?

The primary driver of whisky wash production is yield. Because the optimal ABV of the fermented wash is around 8.5% ABV, the quantity of available sugar left in the weak worts after the end of the sparge would be considerable if a beer wort method were used – in this case the weak worts at the end of run off would be 1.050-1.055 (approx 140 g/L sugar content). Additionally, it is desirable in beer to have unfermented complex sugars in the final beer to give body and a residual ‘sweetness’. Beer worts typically show an attenuation* of 75-80%. If your aim is to maximise the yield of alcohol per tonne of malt both of these factors would be considered a loss to yield. With whisky production, the optimal yield is 415 litres of pure alcohol per tonne of malt input.

It is always important to remember that the (desired) flavour of whisky is defined by the process by which it has been made. And since the nature of the process was fixed before the underlying consequences on the biochemistry of the process were fully understood it is important to (1) follow traditional methods to give the traditional/desired flavour; (2) understand and manage the shortcomings or “features” of these methods to achieve a consistency of yield to, and quality of final product.

*percentage conversion of sugars to alcohol

Malt colour-gradientMash temperature

Traditional wash production uses a mash tun, and normally you would think that this would limit you to an isothermal mash. But with whisky wash production a pseudo step mash is carried out by initially mashing at a low temperature (ideally just above the gelatinisation temperature for the quality of malt, which varies by the season). This favours the production of immediately fermentable sugars. It is then sparged at 75 C to both wash out the sugars already formed and also to raise the mash temperature to activate alpha-amylase thus form and extract complex sugars also.

Run off method

To maximise sugar extraction during sparging, most of the strong worts are run off before the sparge is started. Often the liquor:grist ratio is higher in wash production which means there is more volume to run off. This step needs to be carefully designed to avoid running off too much liquor which could lead to a stuck mash.

No wort boil

Wash is run off directly into the fermenter, it is not boiled. There are a number of consequences to this:

  • Lactic acid bacteria (LAB), present on the surface of all barley malt remain viable and active in the fermenter – they are not denatured by a boiling stage. This needs to be accounted for (see below)

  • In a well run process, active enzymes – amylases but also importantly limit-dextrinase – transfer with the wash into the fermenter

  • Because the wash has not been boiled (which causes vigorous mixing) or recirculated in the copper the wash in the fermenter cannot be directly sampled to gain a representative sample for SG / OG control.

These consequences all need to be managed if you are to achieve product consistency and high yield.

PXL_20231208_141217173

Managing lactic acid bacteria (LAB).

As soon as the wash is formed, LAB start acting on the maltose to form ethyl lactate. Because they convert sugars which could form alcohol this can have an economically significant effect on the yield. For this reason, yeast is pitched into the strong worts, early in the transfer into the FV. The aim is for the yeast to out compete the LAB and minimise losses of sugar to ethyl lactate at the start of the fermentation.

The fruity flavour imparted by ethyl lactate is an important characteristic of whisky so careful management of the fermentation is required to ensure that the level is consistent from batch to batch. At the end of the yeast fermentation, LAB are able to metabolise other oxygenates, such as malic acid to form ethyl lactate. To ensure flavour consistency the length of time that the fermentation is left to stand post completion of yeast action needs to be controlled. It is normal in small scale whisky production for multiple batches of wash to be required to fill one cask with spirit. Because of the impact of five day working not usually possible to allow every fermentation to run for the same length of time, and from this come the terms ‘shorts’ and ‘longs’ describing wash fermentations which have been been completed and distilled within the week or run for longer over a weekend. Each cask of spirit should contain the same proportion of shorts and longs and thus production should run to a regular pattern each week.

Malt enzymes in the fermentation

It is essential for the enzyme limit-dextrinase (from the malt) to remain present and active in the fermentation. For this to happen, the time that the wash remains hot post saccharification needs to be minimised i.e. you need to run off and cool the wort as quickly as possible once starch conversion is complete. It is this enzyme which breaks down the unfermentable sugars in the wash into fermentable sugars which allows a far higher attenuation by the yeast. A typical whisky wash has an OG of 1063, without limit-dextrinase the fermentation would end at an SG of around 1013, with it present the fermentation continues to an SG of 996-1000.

Wash SG control

Ideally the FV (often called a wash back) needs to be able to be recirculated so that the wash gravity (SG) can be accurately measured and controlled, at very least during process commissioning. Remember that wort gets progressively weaker during its transfer, and thus the FV is stratified ‘by design’ and thus non-homogenous. Recirculation could not easily be retro-fitted to the kit I was working on, so I developed and proved an alternative method which I will discuss in my next post.

3rd water

Once all the wash has been collected, the mash bed is sparged again, at a higher temperature still, and this liquor is used for mashing the next batch of malt. This liquor is called 3rd water.

  • First water – liquor used to mash the grist.

  • Second water – sparge liquor sent forwards to the FV.

  • Third water – second sparge liquor containing residual sugars, recycled into the following batch.

In a large distillery, the 3rd water is likely to be used within the hour. In a craft distillery it is likely you will only be making one or two batches of wash per day so you need want to hold some of your 3rd water overnight. What is key here is to keep it above 70 C so it remains free of the effects of bacterial or wild yeast contamination. However, for anyone familiar with smaller scale brewing you know you want your mash water at or close to strike temperature (usually 70-74 C) at the start of the day anyway so it is normal to heat it to 10 C above this the night before knowing it will come in about right the next morning in a well insulated hot liquor tank.

Whisky Galore! Boosting the yield of wash production for a whisky client

PXL_20231208_141206513

A new whisky distillery has opened near to me, so I got in touch to see if they wanted anyone to help making their wash. The owner got back to me the next day to ask if I could help with issues with stuck mashes and slow fermentations.

What might not be obvious to anyone new to the field is that the precursor to whisky spirit is something very akin to beer, but without any hops. I always offer the first hour of consulting time free so I can decide if I can add value for the customer and they can get confidence in the knowledge which I offer. We were soon having a fruitful conversation and the reason for their slow / stuck fermentations became obvious after running a forced fermentation test – they had the wrong mix of sugars in their wort (or wash as it’s called in this industry). Could I help to resolve this? Could I optimise their yield to sugar in the wash and could I advise on best practice CIP methods? Yes, yes, yes!

The benefit of employing someone like me is that my Ph.D background allows me to get up to speed in a new topic in hours, not weeks. Understanding the subtle but important differences between wort and wash production made for fascinating reading. In beer production we choose the mash temperature to control the sweetness and body of the final beer, with whisky one is looking to maximise fermentable sugar extraction. To achieve this the grist is mashed at low temperature, almost all the strong worts are run off and then it is subject to a kind of pseudo step mash by sparging at 75 C to activate the α-amylase to convert areas of the starch which are sterically inaccessible to the β-amylase. But since non-fermentable sugars are of little value to the whisky maker, the wort is not boiled but (cooled and) transferred directly from the mash tun to the FV. Here speed of operation is key because the aim is to transfer active enzymes, including limit-dextrinase, into the FV. As the fermentation progresses these enzymes work on the complex sugars to form maltose which can then be converted to alcohol. Thus efficient operating practices will boost the yield to alcohol.

By observation it was clear that the HX (heat exchanger) which had been installed was far too small which was increasing processing times.

PXL_20240104_154525690

A new HX is now on order, but in the mean time it was important to get production running. Employing a trick to make Brut IPA I advised on an exogenous enzyme we could add to the FV to allow the fermentations to run to completion whilst the new HX is awaited. Roll on two weeks and all fermentations are now reaching their desired terminal gravity and I have given hands on help and coaching which has boosted the sugar extraction yield from 67 to 93% and I aim to increase this still further.

Now my role has moved on to training the guys who are going to be running the brewing side of the process, write some SOP’s (best practice training is always based on an SOP) and help embed consistency of operation and thus yield and flavour profile. It is really satisfying to use my process support skills from my time in the chemical industry in parallel with my technical understanding of the biochemistry of brewing to help yield good consistent spirit in good yield. I must confess to be rather enjoying myself.

Buxton Brewery – what they thought of the Hop Doctor

In November my five months locum / consulting brewing contract with buxtonbrewery will come to a close. What a great group of people. If you are looking for a brewer to help with the demand running up to Christmas or you need someone to cover whilst you recruit and you brew in the NW then drop me a line. If you want to know what you’ll be getting, read the testimonial that Geoff the MD from Buxton presented me this week to aid my transition into future roles

Here’s a exert…

For the full document click here – Will Weston Testimonial – Geoff at Buxton – Oct 23

Cleaning your brew kit – The practical chemistry behind effective soil removal

I still remember the advice given to me by my first head brewer. “The two most important aspects of brewing” he said, “are cleanliness and temperature control.”

There are three classes of soiling you need to deal with in a brewery:

  • Organic soiling – that could be burnt on carbohydrates / proteins on the hot side and yeast residues in your fermenter

  • Inorganic soiling – this would be mostly scale (calcium / magnesium oxide) or calcium oxalate.

  • Biofilms – these tend to form in places where liquor can lie and which don’t see turbulent flow. Under the plates in the mash tun and in wort transfer lines for example.

Organic soiling

The most frequent / routine soiling you’ll be dealing with is organic soiling in the copper and your fermenters. You want to free this off of the vessel walls and then ensure it remains suspended until you can flush it out. The best cleaning agent for organic soils is specially formulated caustic (NaOH) solution. Brewery caustic formulations come with surface active agents in them to improve wetting, sequest metal ions and keen non water soluble soils suspended.

Your CIP caustic solution should be 1-3% NaOH (normally the concentrate is 30% NaOH). Take care with the concentrate and follow your local risk assessment. Googles and gloves are required and always add caustic to water, not water to caustic to avoid it overheating and spitting.

If you are a micro brewery you will not use huge volumes of caustic and it’s worth being aware that you can usually buy something suitable from your local agricultural merchants as it is also used to clean dairy milk tanks. Take care though as dairies tend to prefer formulations that also contain hypochlorite. Evans Vanodine CIP liquid would be a good choice because it contains no chlorine based chemicals.

Different places where I have worked have had different protocols for the cleaning, but be aware that caustic cleaning is most effective at 50-80 C, needs to be recirculated for 15-20 min and should impact on your surfaces at > 1 m/s to guarantee turbulent flow. Why is there an upper limit you may wonder? That is to avoid baking your solids onto the heated surfaces. Here it’s worth mentioning the Sinner diagram:

You need all these factors to clean equipment, and if you reduce one (say chemical strength) you will need to increase one or more of the others (time, temperature or mechanical action). Once your vessel is free of soil you need to flush the caustic out as you definitely don’t want caustic in your beer. Simple phenolphthalein test papers work well to check the flush water.

With the base of your mash tun (below the plates) it is likely that you’ll not be able to use a spray ball system so you are probably looking at more mechanical action. Jumping into the vessel with a bucket and scourer or using a pressure washer!  However this will probably only be necessary 2-4 times a year.  This is a vessel entry, so again follow your local risk assessment.  Actions should include, locking off any mechanical, chemical or heat inputs that you have and ventilating well. 

Often a cold caustic cycle is all that is needed on the fermenter.

Cleaning fermenters – a cautionary tale

After you have transferred the beer from your fermenter there will be a high level of carbon dioxide with it. If you don’t already know, be aware that carbon dioxide reacts with caustic:

CO2(g)+ 2 NaOH(aq) → Na2CO3(aq) + H2O(l)

All of your CO2 gas will become a dissolved solid, result – a big drop in pressure. It is readily possible to collapse an FV because of the vacuum formed. The safe approach to manage this issue will depend on the size of the fermenter. Massive lager FV’s would need an air purge and CO2 monitoring. Smaller vessels can be managed by three x 10 second water sprays and leaving an inlet open during the initial caustic circulation. This worked fine on 5000 L FV’s with a 1 ½” being left open (and a short hose running to the drain).   I have seen people leave the manways cracked open but this is dangerous in its own right as you’ll get hot caustic splashing into the work space – no thank you!

Inorganic soiling

In a small brewery you are most likely to see this in your hot liquor tank or in your casks. Here the aim is to solubilise the Ca / Mg salts with a suitable acid. The preferred option being phosphoric acid or a phosphoric / nitric mixture (NiPac B). This should be used at 1-4% and cold or warm, never above 50 C or it will fume. Again you’ll need a good water flush (see below) afterwards and this time litmus paper to check.

Biofilms

A less frequent task. If these are to be removed with CIP you would use your normal caustic solution (1-3%) but add to it some hydrogen peroxide (0.1-0.2%). However these often tend to build up in pipes where the flow rate is slow – such as the drain lines from your mash / lauter tun. Here the answer is mechanical effort! Sadly Murphy’s don’t sell elbow grease… I’ve had great success with a technique I used in the chemical industry called pigging. This is where an abrasive coated foam ‘pig’ is pushed down a line with air or liquid pressure. In the brew house a lower tech solution is required. Tie a foam scouring pad to a rope and pull through your lines until visual inspection shows them to be clean. The beauty, if there is one, with biofilm is that you can easily see it.

Sanitisation

Here there are a number of options, but a really good one is dilute peracetic acid. If used at 100-200 ppm it is not only an effective bactericide but will not need to be rinsed out of the vessel, simply drained. Another tip I learned is that most people can smell a dilute peracetic acid solution when it is above 75 ppm. So if you cannot smell it, either you have COVID or your solution is now too weak. Peracetic acid is another chemical you can buy readily from your local agricultural agent but again is something to be treated with respect as a concentrate and in accordance with your local risk assessment.

Flushing

Flush before you wash – that way the bulk of the soiling will be washed out and the potency of your cleaning chemicals will be preserved for multiple cycles.

Flush after you wash – Here you can work smart and save both time and water. Three ten second flushes will be a lot more effective than one 1-2 minute continuous spray down. The reason is all down to dilution (diluting by 90% three times (99.9%) is much better than diluting by 98% once).  The pooling of liquor at the bottom of the vessel.

Need more advice?

If you buy your cleaning chemicals from a large supplier they are normally very happy to come and answer any of your questions.  If you are a micro-brewery and this is not an option for you then contact me and I can help.  Having worked in the chemical industry before I started brewing means I have a sound background in chemical safety and vessel cleaning methods.

Advanced Home Brewing Course – Theory & Practice

  • Would you like to take your home brewing to the next level?

  • Would you like 1:1 coaching from a professional brewer?

  • Would you like to have a professionally designed beer recipe, complete with water chemistry for your local water of a style of your choosing?

DSC_1051

Earlier in the year a former colleague from my previous career (Chemical Industry) approached me and asked if I could shadow him on a brew day to help improve his understanding and technique. He had not been wholly satisfied with the beer he had made to that point and wanted to take his brewing to the next level.

I suggested the following, that we spend half a day covering the essentials of brewing science and looking over his brewing set up, then the next day he could brew with advice and input from myself on the best practice methods to use. For the brew day I had written him a recipe to clone his favourite commercial beer.

We both really enjoyed the two days. He said afterwards:

I wanted to improve my skills as a home-brew hobbyist and found so much conflicting and sometimes confusing information online that I didn’t know which way to turn to improve the quality of my beer which I felt had plateaued and at best was average. I also bought a number of brewing books which although a number were very good the time taken to reach mediocrity has been a good couple of years. Having invested several hundred pounds in equipment over this period I decided to reach out to The Hop Doctor to arrange a 1:1 session.The two sessions were fantastic

As well as brewing at commercial scale I also brew at home, but my approach is unusual. Brewing is my second career, and I have taken what I learned at commercial scale and through my IBD professional training and scaled it down to the 23 litre scale. Whilst the internet can be a great resource, there is a great deal of inconsistent and incorrect advice out there. I can bust those myths for you and explain the process based on the latest proven scientific understanding as gained from my IBD Brewing Diploma, commercial experience and my background as a Ph.D chemist.

Advanced Home Brewing – Theory & Practice

  • Half day of theory (with course notes to keep)

  • Shadowed Brew Day with professional advice and Q&A session

Cost: £235 for any location within 40 miles of the BB7 postcode

Other locations considered, travel costs at 75p / mile

Professional recipe design (for home use)

  • Recipe for 5 gallon system plus one recipe iteration (based on your thoughts on the first brew) within 3 months of initial recipe provision.

Cost: £45 (only as an addition to the above)

Spend a day with The Hop Doctor!

Thanks to Will for sharing his amazing level of professional knowledge which would have truly taken me years to learn. I’d highly recommend anyone from novice to intermediate home-brew hobbyist to contact him as I feel the small investment in myself was, is and will be enjoyed for years to come.


Which hop oils survive from the hot side – some recent research from Yakima Chief

My last post on hop addition timing attracted a lot of interest and someone from Yakima Chief reached out to me with a technical data-sheet which they published in 2021. I’ve shown the key chart below which quantifies the nature and level of hop flavour oils which they have detected in a finished beer vs. species and addition time.

hop-pellets

They don’t specify their methodology but compare a set of hop species whose oil content has the combination of concentration and properties (solubility, boiling point etc) which helps them to remain in the beer from the hot side and those whose qualities mean they are best added as a dry hop.

Species

Flavour / Comment*

2-Nonanone

Cheesy / Herbal

Geraniol

Floral

Linalool

Citrus / Fruity

2-Methylbutyl isobutyrate

Fruity / Apricot

Methyl Geranate

Floral

Isoamyl isobutyrate

Apricot / Banana

3-Mercaptohexanol

Tropical / Grapefruit

* A flavour combination is often different from the sum of it’s parts.

Information of hop oil composition is hard to find, so whilst the chart is only qualitative and only covers US varieties it does give a good guide to a range of 20 popular aroma hops. I know that one use I will be able to put this to is to combine hops with different oil profiles to better maximise the breadth of flavour experience in my beers.

A copy of the full data-sheet can be downloaded from here or here. If you are a micro-brewery wanting help with a beer design, please do get in touch and let’s see how I might help.

Towards a theory to explain the best time for hop additions

Is it possible to rationalise the best time to add specific hops into the wort boil? Not simply to maximise their bittering potential (that’s simple), but to extract and retain their flavour potential. This is the question I asked myself. Brewing is my second career, I started my working life as a problem solving chemist underpinned by a Ph.D in chemical mechanisms. Thus it has always been useful to me to understand the reasoning behind how a process is run. The why behind the what. So whilst it’s clear that late addition hops will lose less of their essential oils to evaporation, would it be possible to come up with an overall theoretical basis for which any hop flavour is best obtained at specific times within the boil? (not just the trendy ones.) I think the answer is yes.

I’ll not squander your time on the ideas that didn’t work and cut to the chase. When I drew up a list of all the essential oils which I could name if was clear that different flavour classes fell into different chemical functional group classes. i.e. All woody and spices flavour oils are higher molecular weight (MW) hydrocarbons or oxidation products of these.  Citrus flavours come from low molecular weight (C10) unsaturated terpenes / terpene alcohols and so on. Here is my list of those chemical classes:

Aroma / Flavour

Chemical class

Spicy / Herbal

Oxidation product (high MW)

Woody

Oxidation product (high MW)

Purely spicy

Oxidation product (low MW)

Passion Fruit

Thiol

Tropical Fruit

Thiol

Citrus

Unsaturated oxygenate

Floral

Unsaturated oxygenate or Biotransformate

Pine

Terpene

Resinous

Terpene

Grassy

Aldehyde (low MW)

If you then list the oils by boiling point, the rationale behind their use starts to becomes clear.

So what do we learn?

  • Hop derived traditional British beer flavours can survive from the first wort hop additions because of their high boiling point.

  • In general spicy herbal flavours are likely to require a reasonable length of time in the boil to facilitate their oxidation to epoxides, probably at least 20 minutes.

  • Experience suggests that oils with a boiling point below 230 C are readily lost and should be added at the whirlpool.(1)

  • Flavours from biotransformation are best achieved by dry hopping or whirlpool additions.

  • Add to the above knowledge the very low concentration of thiols present in hops and you can see that tropical flavours are only likely to be obvious from whirlpool or dry hop additions.

On these basis we can rationally add hops into the wort at the point which will maximise the flavour component we are seeking. So take Perle hops for example, which can offer both spicy and orange flavours. The spicy flavours would be best gained by adding in the flavour section to (+20 / +30 min) to allow time for oxidation. However, if we want the pine / orange flavours from this hop then this would be best achieved at the whirlpool. Observations such as this explain why the addition of the same hop at different stages of the boil can give a greater breadth of flavour to the beer. The same is true with dry hopping where additions during active fermentation should be expected to yield more biotransformation flavours that those added during warm conditioning. Thus a rationale for double dry hopping, but only if the correct hop varieties are used (those containing Geraniol / Linalool). Although I still suspect that the DDH moniker is more of a marketing term than a zymological one.

What I’d like to do next is to tabulate the flavour threshold of all of these oils to see what extra insight this sheds into the area. Highly experienced brewers are likely to have come to the above conclusions simply through their breadth of experience, but I know I’ve found it satisfying to bring some rational (ab initio) light to shine on this question.

I would really love to hear your constructive feedback on these ideas.

(1) 85% of hop oils added at the start of a wort boil are lost during the boil – F.R. Sharpe & D.R.J. Laws, J. Inst, Brew, 1981, vol 87, 96-107.

Acknowledgements: My thanks to Will Rodgers at Charles Faram and Thomas Shellhammer at Orgegon State University for helpful discussions

The importance of pH control in brewing

All through the brewing process, having your mash liquor, wort and proto-beer within the desired pH window is critical to both quality and yield. When we are mashing or fermenting we are relying on enzymes which work best within a tight pH window. During boiling it is chemistry rather than biochemistry which is at play, but still pH is critical to the final beer quality.

The chart below shows the ideal pH window as it tracks through the whole brewing process.

Mashing

During the mash we want the α and β amylases to work as effectively as possible and that means that the mash should be between pH 5.2 and 5.4. This is controlled primarily by your water chemistry which I covered in an earlier post. If your pH is too low your starch conversion efficiency will drop, if it’s too high you’ll start to extract tannins and silicates which you want to leave behind in the spent grain. If you are running a new recipe it’s wise to check this pH on the first couple of runs to make sure it within range. This is doubly important with darker beers, where the roasted malts can have a big impact on the pH. There are ways to estimate this, but they are only estimates and it’s best to check what you’ve achieved and adjust your calcium or bicarb addition levels on porters and stouts. After that it’s good to check your run off pH once a week / fortnight to check nothing has drifted.

That astringency that you taste in some stouts, it shouldn’t be there! That is someone not properly attending to their mash pH.

Mashing is the stage where pH is most critical, if you get inside the correct window here then it should track within the desired window for the rest of the process for beers above 3.0% ABV.

Sparging

Here you should be using either pH or SG to monitor your last runnings so as not to go too far. That last portion of weak worts doesn’t contain a whole lot of sugar but will contain undesirable levels of polyphenols or lipids if you let the pH go above 5.8 or SG below 1.006. Remember you are sparging with water which will be pH 7 or slightly above, so the pH of the run off will start to rise from the middle of the sparge onwards

Boiling

There’s a lot that goes on in the boil. The pH will impact the colour development, hop α-acid isomerisation and protein drop out (thus final haze stability). Different pH’s are ideal for each, so the key here is consistency. The pH drops during the boil due to the acid end products of the Maillard reaction and more Ca phosphate precipitation. If necessary you can add a little phosphoric or lactic acid during the boil if the pH is outside of your normal range. However if you have got your mash pH correct and not over-sparged you shouldn’t have an issue. If you are making a low alcohol beer you are likely to need to add a little acid to drop the pH into range.

Fermentation

Again we are trying to keep the enzymes happy and so long as we’ve done everything right up to this point all should be well. Yeast produces acids as a by-product of cell growth and also as one of it’s sugar transport mechanisms. One key thing to remember is to drop the yeast, or transfer the beer off the yeast in a timely fashion or you’ll see your pH rise, reducing shelf life as well as adding undesired ‘beefy’ flavours to your beer. If you are making a low alcohol beer again extra care should be taken and the pH adjusted if necessary.

pH measurement

After spending 20 years in the chemical industry I know more than a little about temperamental pH meters. If you are going to buy a pH meter don’t skimp on price or pick the cheapest one you can find on Amazon. These will never be as accurate or repeatable as you’ll need for brewing. Something from Myron or a bench based model from Jenway would be good options. If you cannot spend £250 then your better option would be to get some narrow range pH test sticks (try these or these). These may not be as precise but if you want something inexpensive yet accurate they are your very best option. You can know for sure if you are sitting inside your desired range or when to stop your sparge. They are quick too.

How to perform a diacetyl test – and why you should.

What is diacetyl?

For yeast cells to grow they need nutrients, some for energy and some to build new cell material to enable multiplication. That which they cannot draw from the wort, the yeast needs to synthesise from simpler starting materials. During the synthesis of the amino acid valine, a by-product is diacetyl.

Diacetyl chem structure pic

The challenge with diacetyl is that it has a low taste threshold and it tastes of butterscotch, not a flavour we want in most beers.

How is diacetyl formed?

It is good to understand this, as it underpins how the diacetyl test works. As with most biochemical pathways, the formation of diacetyl is a multi-stage process. It is important to understand that up until the penultimate stage these steps are enzyme catalysed (i.e. fast) but the final step from α-acetolactate (AAL) to diacetyl is a simple but slow chemical reaction. With AAL being capable of being formed faster than it is consumed, a residual concentration can build up in the final stages of fermentation. This is especially true in lower temperature fermentations. Thus once your ale / lager has reached its terminal gravity it may not taste of diacetyl, but if AAL is present, it will be formed with time in the final package. Thankfully yeast also contains an enzyme which will reduce diacetyl to 2,3-butandiol which has a far higher taste threshold and this eliminates the off flavour issue. Thus the diacetyl rest, a period of warm conditioning at the end of fermentation, which allows the AAL to convert to diacetyl and under conditions where it can be consumed to form something essentially flavourless. Cool down the green beer and this enzyme cannot act.

So what is a diacetyl test and how to I perform it?

You could take a sample of your green beer and inject it into an HPLC and see if AAL is still present, but if you don’t have a spare £25k burning a hole in your pocket there is a far simpler and cheaper method:

Take two samples of your green beer, 50 ml each is enough, into sealed bottles. Place one into the fridge (the control) and drop the other into a jug of hot water at 60-70 C, chances are you have some hot liquor to hand which would be ideal for this. Leave the sample in the hot water for 20 min then remove and cool. Then all you need to do is to taste both samples.

  • Can you taste butterscotch in the heated sample (having the control sample to compare against makes this assessment much easier) – If you can then you have some AAL still present in your green beer which will form diacetyl with time. The green beer needs longer to warm condition so hold at 16-20 C for another 24-48 hours and then run the test again.
  • There is no diacetyl taste to either sample – your beer is ready to chill and move forwards.

My experience

Residual AAL / diacetyl is present at the end of the primary fermentation of some recipes but not all. The key factors are the choice of yeast, malt bill and fermentation temperature. Some combinations will require a diacetyl rest, some will not. Some craft breweries are paranoid about diacetyl in their beer and warm condition all their batches, but unless you are making a lager, this is an unnecessary loss of brewery efficiency. When you are running a new recipe then run the test for the first three gyles. If the test comes out negative at the end of each primary fermentation then unless you change anything it always will. Carry out warm maturation only on the beers which need it. Beer design is, in part, an art but its manufacture is certainly a science.

If you find yourself with a beer design where AAL / diacetyl is present at the end of the primary fermentation you do have another option. That is to add an exogenous enzyme (AAL decarboxylase / ALDC ) into your FV at the start of fermentation to guarantee that all the AAL will be quickly reduced to acetoin and no diacetyl will ever be formed.

Would you like help with the consistency of your beer quality? If so give me a call and we could arrange a phone / video consultation or if you are local I could come out and help you in person.