Cleaning your brew kit – The practical chemistry behind effective soil removal

I still remember the advice given to me by my first head brewer. “The two most important aspects of brewing” he said, “are cleanliness and temperature control.”

There are three classes of soiling you need to deal with in a brewery:

  • Organic soiling – that could be burnt on carbohydrates / proteins on the hot side and yeast residues in your fermenter

  • Inorganic soiling – this would be mostly scale (calcium / magnesium oxide) or calcium oxalate.

  • Biofilms – these tend to form in places where liquor can lie and which don’t see turbulent flow. Under the plates in the mash tun and in wort transfer lines for example.

Organic soiling

The most frequent / routine soiling you’ll be dealing with is organic soiling in the copper and your fermenters. You want to free this off of the vessel walls and then ensure it remains suspended until you can flush it out. The best cleaning agent for organic soils is specially formulated caustic (NaOH) solution. Brewery caustic formulations come with surface active agents in them to improve wetting, sequest metal ions and keen non water soluble soils suspended.

Your CIP caustic solution should be 1-3% NaOH (normally the concentrate is 30% NaOH). Take care with the concentrate and follow your local risk assessment. Googles and gloves are required and always add caustic to water, not water to caustic to avoid it overheating and spitting.

If you are a micro brewery you will not use huge volumes of caustic and it’s worth being aware that you can usually buy something suitable from your local agricultural merchants as it is also used to clean dairy milk tanks. Take care though as dairies tend to prefer formulations that also contain hypochlorite. Evans Vanodine CIP liquid would be a good choice because it contains no chlorine based chemicals.

Different places where I have worked have had different protocols for the cleaning, but be aware that caustic cleaning is most effective at 50-80 C, needs to be recirculated for 15-20 min and should impact on your surfaces at > 1 m/s to guarantee turbulent flow. Why is there an upper limit you may wonder? That is to avoid baking your solids onto the heated surfaces. Here it’s worth mentioning the Sinner diagram:

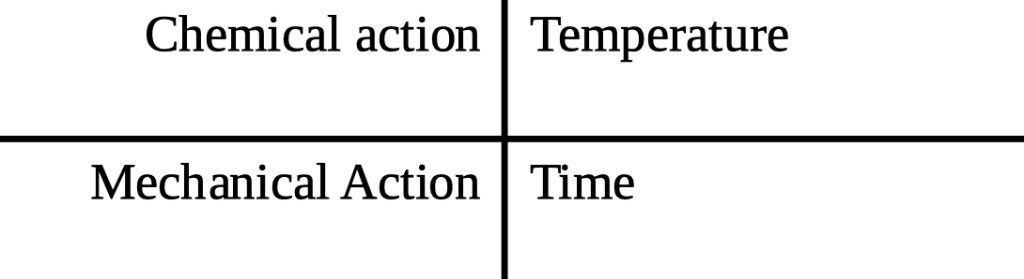
You need all these factors to clean equipment, and if you reduce one (say chemical strength) you will need to increase one or more of the others (time, temperature or mechanical action). Once your vessel is free of soil you need to flush the caustic out as you definitely don’t want caustic in your beer. Simple phenolphthalein test papers work well to check the flush water.

With the base of your mash tun (below the plates) it is likely that you’ll not be able to use a spray ball system so you are probably looking at more mechanical action. Jumping into the vessel with a bucket and scourer or using a pressure washer!  However this will probably only be necessary 2-4 times a year.  This is a vessel entry, so again follow your local risk assessment.  Actions should include, locking off any mechanical, chemical or heat inputs that you have and ventilating well. 

Often a cold caustic cycle is all that is needed on the fermenter.

Cleaning fermenters – a cautionary tale

After you have transferred the beer from your fermenter there will be a high level of carbon dioxide with it. If you don’t already know, be aware that carbon dioxide reacts with caustic:

CO2(g)+ 2 NaOH(aq) → Na2CO3(aq) + H2O(l)

All of your CO2 gas will become a dissolved solid, result – a big drop in pressure. It is readily possible to collapse an FV because of the vacuum formed. The safe approach to manage this issue will depend on the size of the fermenter. Massive lager FV’s would need an air purge and CO2 monitoring. Smaller vessels can be managed by three x 10 second water sprays and leaving an inlet open during the initial caustic circulation. This worked fine on 5000 L FV’s with a 1 ½” being left open (and a short hose running to the drain).   I have seen people leave the manways cracked open but this is dangerous in its own right as you’ll get hot caustic splashing into the work space – no thank you!

Inorganic soiling

In a small brewery you are most likely to see this in your hot liquor tank or in your casks. Here the aim is to solubilise the Ca / Mg salts with a suitable acid. The preferred option being phosphoric acid or a phosphoric / nitric mixture (NiPac B). This should be used at 1-4% and cold or warm, never above 50 C or it will fume. Again you’ll need a good water flush (see below) afterwards and this time litmus paper to check.

Biofilms

A less frequent task. If these are to be removed with CIP you would use your normal caustic solution (1-3%) but add to it some hydrogen peroxide (0.1-0.2%). However these often tend to build up in pipes where the flow rate is slow – such as the drain lines from your mash / lauter tun. Here the answer is mechanical effort! Sadly Murphy’s don’t sell elbow grease… I’ve had great success with a technique I used in the chemical industry called pigging. This is where an abrasive coated foam ‘pig’ is pushed down a line with air or liquid pressure. In the brew house a lower tech solution is required. Tie a foam scouring pad to a rope and pull through your lines until visual inspection shows them to be clean. The beauty, if there is one, with biofilm is that you can easily see it.

Sanitisation

Here there are a number of options, but a really good one is dilute peracetic acid. If used at 100-200 ppm it is not only an effective bactericide but will not need to be rinsed out of the vessel, simply drained. Another tip I learned is that most people can smell a dilute peracetic acid solution when it is above 75 ppm. So if you cannot smell it, either you have COVID or your solution is now too weak. Peracetic acid is another chemical you can buy readily from your local agricultural agent but again is something to be treated with respect as a concentrate and in accordance with your local risk assessment.

Flushing

Flush before you wash – that way the bulk of the soiling will be washed out and the potency of your cleaning chemicals will be preserved for multiple cycles.

Flush after you wash – Here you can work smart and save both time and water. Three ten second flushes will be a lot more effective than one 1-2 minute continuous spray down. The reason is all down to dilution (diluting by 90% three times (99.9%) is much better than diluting by 98% once).  The pooling of liquor at the bottom of the vessel.

Need more advice?

If you buy your cleaning chemicals from a large supplier they are normally very happy to come and answer any of your questions.  If you are a micro-brewery and this is not an option for you then contact me and I can help.  Having worked in the chemical industry before I started brewing means I have a sound background in chemical safety and vessel cleaning methods.

Understanding Water Chemistry

Understanding and controlling the water chemistry of your brewing liquor is essential to making excellent beer at high yields.

Step back 150 years and the reason why some water sources gave better beer at better yields was simply not understood. Certain cities became famous for the beers which worked out best with their water. Through a process of trial and error, brewers worked out which beer styles best suited the water they had available to them. London was noted for its’ Porter, Burton-on-Trent for pale hoppy beers (in those days meaning bitter rather than rich with hop oils), Dublin for Stout, Pilsen and Budweis for pale lagers and so on. In was only in 1850’s that a Dr Sheridan Muspratt speculated that the gypsum in Burton well water is what made it special. We had to wait until the early 20th century before the full picture emerged and showed the importance of Calcium (Ca2+), Magnesium (Mg2+), carbonate (CO32-) sulphate (SO42-) and chloride (Cl) ions across multiple stages of the brewing process.

Some people think of water chemistry as too complicated and simply ignore it, but that approach means that both the brewer and the drinker miss out on a wide range of benefits from designing their brewing liquor composition correctly. So what are the main benefits?

  • The pH in the mash is critical* and this is influenced by the alkalinity of the water which is increased by carbonate, but reduced by Ca2+ and Mg2+ ions {via the precipitation of Ca / Mg phosphate salts resulting in the release of hydrogen ions (H+)}

*In the mash you are using the power of enzymes such as α and β amylase to break down the barley starch into sugars. Enzymes are very sensitive to their environment, they work best within tight pH, temperature and reagent concentration windows.

  • α-amylase is stabilised by calcium ions, and thus more long lived and effective when they are present at a sufficient concentration.

  • Together this means that you will get a better extract yield with the correct calcium concentration in your brewing liquor. Darker beers need more calcium to compensate for their lower enzyme level too.

  • Yeast health and flocculation is aided by calcium ions.

  • We now know that it is not simply sulphate, but the sulphate to chloride ratio which is important in beer. This impacts which aspects of the beer are most prominent to the palate of the drinker. They are perhaps best thought of as seasoning. A high sulphate:chloride ratio (say 3:1) will express the bitterness where as a low sulphate:chloride ratio (say 1:2) will bring out the malty flavours.

The great news is, now that we understand the impact of water chemistry, we should be able to brew excellent beers of almost any style anywhere in the world simply by adding or removing the desired ions from the water to meet our needs. So now know the most significant benefits, what are we going to control and how are we going to do it?

Step 1 – understand the composition of your incoming water.

The best option is to have your water analysed for its “mineral” (dissolved ionic salts) composition. If you are using spring or well water this will be your only option. If you are buying a significant amount of brewing products from Murphy’s & Sons they will happily analyse your incoming water once a year for free. If not they offer this as a paid service for around £30. A very worthwhile investment.

If you are using mains / municipal water, another option is to search for the website of your local water company, most of them publish the ‘average composition’ of the water they provide by postcode. Expect water from rainwater catchment to be low in Ca and other dissolved salts, but ground water to be rather higher because of the salts dissolved from the rocks it has passed through.

Look out for elevated levels of Fe (> 0.5 ppm), Cu ( > 0.5 ppm), Mn (> 0.1 ppm) or nitrate (> 10 ppm) in your water too. If they are above these levels they will cause you flavour issues from day one, reduce your shelf life and impact your yeast health. If present at elevated, you will need to install an ion exchange column or related technology to reduce their level/s.

Step 2 – decide your ideal calcium, sulphate and chloride levels for the beer style

Style

[Ca] / ppm

Alkalinity

(as ppm CaCO3)

[SO42-]

[Cl]

SO4:Cl

Pale lager

50-75

0-40

0-150

50-100

1:1

Pale Ale

50-100

0-80

50-150

50-100

2:1

Amber Ale

50-150

80-200

50-150

50-150

1:1

Stout

50-75

80-160

50-150

50-150

1:2

They are quoted as ranges because (i) you usually have to work within the constraints of your raw water, which will already contain some of these ions, and (ii) you may need also to reduce the alkalinity of the water by the addition of calcium sulphate / chloride (see step 3). In most cases it would be impossible to hit precise values for all these aspects; fortunately experience shows that it is not necessary to be that precise.

Step 3 – calculate the total and residual alkalinity of your water.

Look for the ‘total alkalinity’ TA value (quoted as ppm CaCO3), Ca and Mg levels in your water report. From these you can calculate the residual alkalinity RA you would expect in your mash.

RA = TA – ([Ca in ppm] / 1.4) – ([Mg in ppm] / 1.7)

Using this equation, check whether, with your first approximation of your planned calcium level, whether your RA will fall into range. If not, will it come in range if you increase the Ca level to near the top of the desired window? If the answer is still no, which is likely to be the case if you are making a Stout with soft water for example, then you will need to add some sodium bicarbonate (NaHCO3) to increase the alkalinity without changing the calcium level. Experimental studies show that for every 10 ppm you want to increase the TA (in ppm CaCO3 equivalent) you need to add 17 ppm NaHCO3.

Step 4 – calculate the ratio of CaSO4 to CaCl2 you need to use.

The calcium that you add can be in the form of the sulphate or the chloride. Brewing textbooks will take you into the unique realm of milli-equivalents. But since I was a chemist before I was a brewer I’d suggest it’s easier just to look at the mass of each anion (sulphate or chloride) you want to use and calculate how much calcium this contributes. If you build a simple spreadsheet based on the following compositions / assays of the brewing salts it is quick and simple to adjust the levels iteratively until you get both your SO4:Cl ratio and [Ca] into range.

Salt

[Metal ion] / % w/w

[Anion] / % w/w

CaCl2.1.84H2O§

28.3

48.7

CaSO4 (gypsum)

29.5

70.5

MgCl2.6H2O§

12.0

34.9

MgSO4 (Epsom salts)

12.0

47.2

NaCl

39.3

60.7

§Commercially available chloride salts are hydrates, they contain a small amount of water chemically bound within the structure.  77% CaCl2 is the hydrate shown above. For simplicity in the main text I have not included the waters of crystallisation in the formulae.

I have included sodium chloride (NaCl) and the two magnesium (Mg) salts here too. If you have water which is already naturally high in calcium, it may not be possible to balance the SO4:Cl ratio without exceeding the desired total calcium level. In such cases you can add the required anion as the magnesium or sodium salt thus leaving the calcium level unchanged. Do note though that you should not exceed 100 ppm Na (starts to taste salty) or 15 ppm Mg (becomes a laxative!) if you do need to use these.

Worked example

We want to make a hop forward blonde ale…

Step 1 – find out the quality of the raw water

We get the following analysis back on the quality of our incoming mains water:

Component

Concentration

Alkalinity (TA)

140 ppm as CaCO3

Ca

80 ppm

Mg

3.2 ppm

Na

10.6 ppm

SO4

120 ppm

Cl

23 ppm


Step 2 – decide the ideal water profile for what we are making

For a hop forward blonde ale we would ideally required:

Component

Concentration

Alkalinity (RA)

50-100 ppm as CaCO3

Ca

50-100 ppm

SO4

50 -150 ppm

Cl

0-100 ppm

SO4:Cl

2:1

Since we want to make a hop forward style we will malt to suppress the malt flavours to showcase the hops so we would look for a high SO4:Cl ratio, let’s assume we aim for 2:1.  Also let’s clarify here, this is the ratio of the weight of sulphate to the weight of chloride, it’s as simple as that (no reason to be thinking about moles or milli-equivalents)


Step 3 – Calculate the residual alkalinity (RA) at the desired [Ca]

The calcium level in our water is already within the desired range, so we would calculate the RA based on the raw water itself.

RA = TA – ([Ca in ppm] / 1.4) – ([Mg in ppm] / 1.7)

RA = 140 – (80 / 1.4) – (3.2 / 1.7)

RA = 79.7 ppm as CaCO3

This too falls within our target range.


Step 4 – calculate the ratio of CaSO4 to CaCl2 you need to use.

The level of sulphate in our water is already high but the chloride low, the ratio of SO4:Cl being 5.2:1. Thus we are going to need to add a chloride salt to reduce this ratio. We have two options, we could add CaCl2 to get our 2:1 ratio but the resultant [Ca] would then be 101 ppm and the new RA = 66 ppm as CaCO3. The Ca level would be only just outside the desired range so that would probably be acceptable. Another option would be to add the chloride as NaCl which would leave the [Ca] and RA unchanged. Let us look at how we calculate this addition.

Desired [Cl] = 60 ppm

Current chloride conc. = 23 ppm

Need to increase [Cl] by 60 – 23 = 37 ppm

Using the table above we note that NaCl is 60.7% Cl so the additional [NaCl] required to achieve this is:

37 ppm / 60.7% = 61 ppm NaCl

Finally let’s check that this does not take the total [Na] above 100 ppm.

Na contribution from 61 ppm NaCl

= 61 x 39.3% Na

= 24.0 ppm Na

Total [Na] = contribution from raw water plus contribution from added NaCl

= 10.6 + 24.0 = 34.6 ppm.

So we have our answer, because we already have a gypsum rich water supply we need only add 24 ppm, or 24 mg per litre, of NaCl to get the ideal brewing liquor for our blonde ale.

If you would like more help with water chemistry, contact me and we can look at it together.