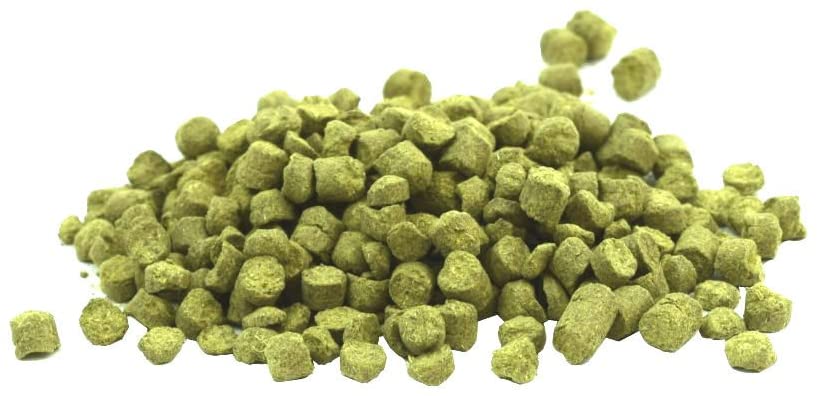
All hops degrade with time, especially if in contact with air. The HSI (Hop Stability Index) is a measure of the rate of oxidation of the alpha and beta acids with time. The value quoted relates to the extent of oxidation of these bittering acids when in the presence of air at 20 °C over a period of six months.
Why is this important?
Whilst the bittering potential of an open package of a high HSI hop will reduce significantly over time, it is not the economics which matter most to a brewer who only only brews infrequently or at a small scale. The issue which should concern you is a change in the nature of the bitterness which is imparted. As the bittering acids oxidise their flavour changes, and rather than the typical neutral bitterness you want, you are likely to get a vegetal like bitterness; like that you would get with overcooked cabbage or sprouts. This is not pleasant.
How do I avoid this problem?
All the time your hop pellets are in sealed, oxygen free, bags they cannot oxidise. It is open bags, which are now in contact with oxygen where you will have a problem. For more information, see this article. It is good practice to chill all of your hops, but this is even more important once the bag has been opened. If you want to store an open bag of hop pellets for more that a few weeks you are best advised to seal the bag as best you can and keep in a freezer. Larger breweries will use whole bags of pellets / whole tins of extract either within a batch, or within the week and this overcomes the issue, but for smaller producers, like brew pubs, or new smaller businesses this is not going to be an option.
The easiest and most practical option to manage hop acid oxidation is to choose your hop varieties carefully. Look up the characteristics of several hop varieties which give you the properties / flavour profile you are looking for, and choose only hops where the HSI is < 30%. To exemplify this consider Columbus, this is a very high alpha acid hop, seemingly ideal as a bittering hop. However the HSI is 45% and thus is not a variety I’d recommend to smaller breweries who will not use a whole bag within a fortnight. Similarly Centennial is a sublime aroma hop for lovely, well retained citrus / grapefruit flavours (see my article concerning hops whose flavour with the best retention into the final beer) but again it has a high HSI and will start to give you unpleasant flavours if the bag has been open for more than 2-3 weeks.
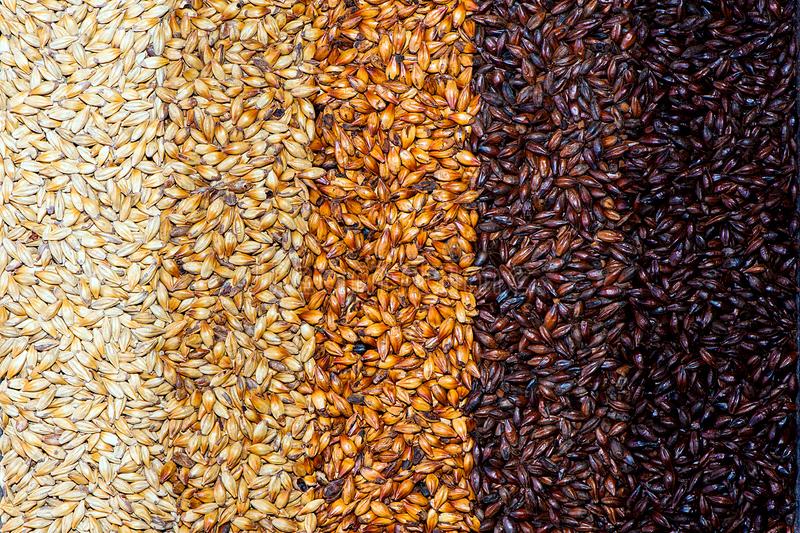
Good hop choices
Fortunately we are now blessed with such a broad range of hop varieties that, with access to the right knowledge one can choose a hop which has the flavours you want and is practical for your scale of operation. Here are some examples to get you started…
Congratulation to George and the team at The Patron’s Tap in Blackburn on winning the Beer of the Festival at the Clitheroe Beer Festival 2024. George designed the beer, I did the scale up calculations and brewed the beer. They always have one of their own beers on tap, so if you are in Guide drop into this great little bar and taste one of their award winning ales.
If you want help brewing award winning ales and are in the North West of England, drop me a line...
Would you like to take your home brewing to the next level?
Would you like 1:1 coaching from a professional brewer?
Would you like to have a professionally designed beer recipe, complete with water chemistry for your local water of a style of your choosing?
Earlier in the year a former colleague from my previous career (Chemical Industry) approached me and asked if I could shadow him on a brew day to help improve his understanding and technique. He had not been wholly satisfied with the beer he had made to that point and wanted to take his brewing to the next level.
I suggested the following, that we spend half a day covering the essentials of brewing science and looking over his brewing set up, then the next day he could brew with advice and input from myself on the best practice methods to use. For the brew day I had written him a recipe to clone his favourite commercial beer.
We both really enjoyed the two days. He said afterwards:
I wanted to improve my skills as a home-brew hobbyist and found so much conflicting and sometimes confusing information online that I didn’t know which way to turn to improve the quality of my beer which I felt had plateaued and at best was average. I also bought a number of brewing books which although a number were very good the time taken to reach mediocrity has been a good couple of years. Having invested several hundred pounds in equipment over this period I decided to reach out to The Hop Doctor to arrange a 1:1 session.The two sessions were fantastic
As well as brewing at commercial scale I also brew at home, but my approach is unusual. Brewing is my second career, and I have taken what I learned at commercial scale and through my IBD professional training and scaled it down to the 23 litre scale. Whilst the internet can be a great resource, there is a great deal of inconsistent and incorrect advice out there. I can bust those myths for you and explain the process based on the latest proven scientific understanding as gained from my IBD Brewing Diploma, commercial experience and my background as a Ph.D chemist.
Advanced Home Brewing – Theory & Practice
Half day of theory (with course notes to keep)
Shadowed Brew Day with professional advice and Q&A session
Cost: £235 for any location within 40 miles of the BB7 postcode
Other locations considered, travel costs at 75p / mile
Professional recipe design (for home use)
Recipe for 5 gallon system plus one recipe iteration (based on your thoughts on the first brew) within 3 months of initial recipe provision.
Cost: £45 (only as an addition to the above)
Spend a day with The Hop Doctor!
Thanks to Will for sharing his amazing level of professional knowledge which would have truly taken me years to learn. I’d highly recommend anyone from novice to intermediate home-brew hobbyist to contact him as I feel the small investment in myself was, is and will be enjoyed for years to come.
My last post on hop addition timing attracted a lot of interest and someone from Yakima Chief reached out to me with a technical data-sheet which they published in 2021. I’ve shown the key chart below which quantifies the nature and level of hop flavour oils which they have detected in a finished beer vs. species and addition time.
They don’t specify their methodology but compare a set of hop species whose oil content has the combination of concentration and properties (solubility, boiling point etc) which helps them to remain in the beer from the hot side and those whose qualities mean they are best added as a dry hop.
Species
Flavour / Comment*
2-Nonanone
Cheesy / Herbal
Geraniol
Floral
Linalool
Citrus / Fruity
2-Methylbutyl isobutyrate
Fruity / Apricot
Methyl Geranate
Floral
Isoamyl isobutyrate
Apricot / Banana
3-Mercaptohexanol
Tropical / Grapefruit
* A flavour combination is often different from the sum of it’s parts.
Information of hop oil composition is hard to find, so whilst the chart is only qualitative and only covers US varieties it does give a good guide to a range of 20 popular aroma hops. I know that one use I will be able to put this to is to combine hops with different oil profiles to better maximise the breadth of flavour experience in my beers.
A copy of the full data-sheet can be downloaded from here or here. If you are a micro-brewery wanting help with a beer design, please do get in touch and let’s see how I might help.
Is it possible to rationalise the best time to add specific hops into the wort boil? Not simply to maximise their bittering potential (that’s simple), but to extract and retain their flavour potential. This is the question I asked myself. Brewing is my second career, I started my working life as a problem solving chemist underpinned by a Ph.D in chemical mechanisms. Thus it has always been useful to me to understand the reasoning behind how a process is run. The why behind the what. So whilst it’s clear that late addition hops will lose less of their essential oils to evaporation, would it be possible to come up with an overall theoretical basis for which any hop flavour is best obtained at specific times within the boil? (not just the trendy ones.) I think the answer is yes.
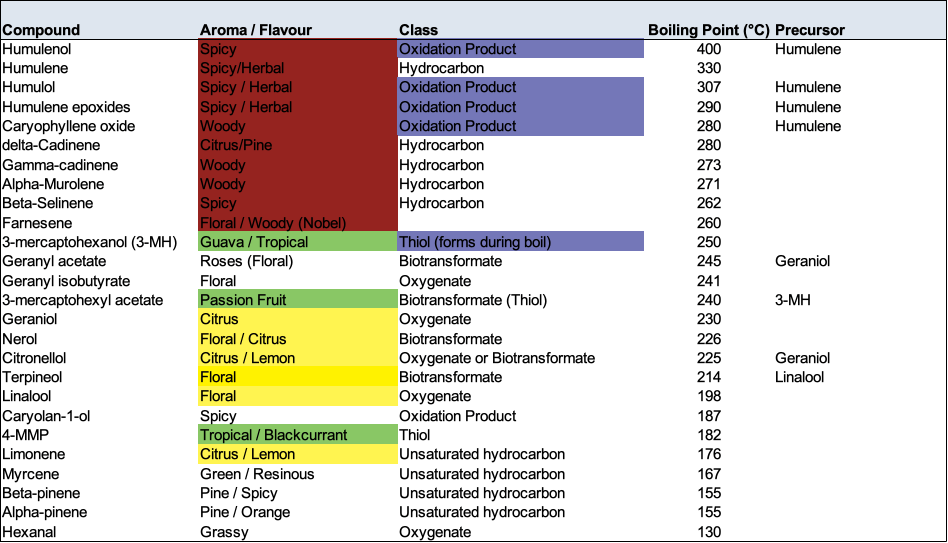
I’ll not squander your time on the ideas that didn’t work and cut to the chase. When I drew up a list of all the essential oils which I could name if was clear that different flavour classes fell into different chemical functional group classes. i.e. All woody and spices flavour oils are higher molecular weight (MW) hydrocarbons or oxidation products of these. Citrus flavours come from low molecular weight (C10) unsaturated terpenes / terpene alcohols and so on. Here is my list of those chemical classes:
Aroma / Flavour
Chemical class
Spicy / Herbal
Oxidation product (high MW)
Woody
Oxidation product (high MW)
Purely spicy
Oxidation product (low MW)
Passion Fruit
Thiol
Tropical Fruit
Thiol
Citrus
Unsaturated oxygenate
Floral
Unsaturated oxygenate or Biotransformate
Pine
Terpene
Resinous
Terpene
Grassy
Aldehyde (low MW)
If you then list the oils by boiling point, the rationale behind their use starts to becomes clear.
So what do we learn?
Hop derived traditional British beer flavours can survive from the first wort hop additions because of their high boiling point.
In general spicy herbal flavours are likely to require a reasonable length of time in the boil to facilitate their oxidation to epoxides, probably at least 20 minutes.
Experience suggests that oils with a boiling point below 230 C are readily lost and should be added at the whirlpool.(1)
Flavours from biotransformation are best achieved by dry hopping or whirlpool additions.
Add to the above knowledge the very low concentration of thiols present in hops and you can see that tropical flavours are only likely to be obvious from whirlpool or dry hop additions.
On these basis we can rationally add hops into the wort at the point which will maximise the flavour component we are seeking. So take Perle hops for example, which can offer both spicy and orange flavours. The spicy flavours would be best gained by adding in the flavour section to (+20 / +30 min) to allow time for oxidation. However, if we want the pine / orange flavours from this hop then this would be best achieved at the whirlpool. Observations such as this explain why the addition of the same hop at different stages of the boil can give a greater breadth of flavour to the beer. The same is true with dry hopping where additions during active fermentation should be expected to yield more biotransformation flavours that those added during warm conditioning. Thus a rationale for double dry hopping, but only if the correct hop varieties are used (those containing Geraniol / Linalool). Although I still suspect that the DDH moniker is more of a marketing term than a zymological one.
What I’d like to do next is to tabulate the flavour threshold of all of these oils to see what extra insight this sheds into the area. Highly experienced brewers are likely to have come to the above conclusions simply through their breadth of experience, but I know I’ve found it satisfying to bring some rational (ab initio) light to shine on this question.
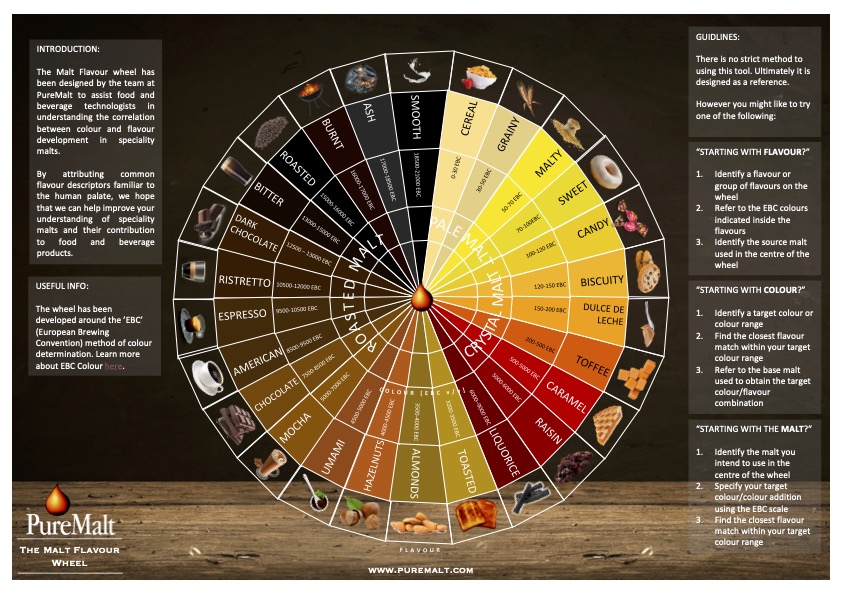
The current craft beer scene has it’s focus on hops, these are the celebrities of today’s beer. But behind every great hop there has to be a great malt base!
A great beer is more than just aroma. The first thing that a customer assesses about a beer is it’s appearance and that is shaped by the malt bill. Whether you are looking for clarity or murky haziness, a brim full glass or a deep long lasting head these aspects come from the malt (and/or adjuncts) which form the grist. The range of malts available to us today is a veritable kaleidoscope
There is such a breadth of flavour options there, but the topic for this post are the less obvious characteristics which we can use to impact the more subtle but equally important aspects of our beer design.
Clarity or Haze…
The current trend in the UK is for hazy IPA’s. Permanent haze in beer comes mainly from protein-polyphenol complexes or beta-glucan and related polysaccharides. But you need the right protein, not just any protein. Here you should be looking at malted wheat. Torrified wheat has a high haze potential, but being ‘less-modified’ the protein fraction is of a larger molecular weight which tends to drop out with time. To further aid the haze and to give that ‘pillowy softness’ then use some malted oats which contribute beta-glucan / polysaccharides to achieve these effects. Don’t go crazy with the amount you use however as the lack of husk on the wheat or the beta-glucans in the oats could make for a very slow run off from your mash tun.
What if your aim is a beer of the ultimate clarity? This is probably best achieved by good water chemistry, careful optimisation of your boil time, kettle and auxiliary finings. But if you are working at the micro scale then finings optimisation trials are not always an easy option. Did you know that the major source of the polyphenols behind haze is the base malt, not the hops? Crisp offer a malt which they call ‘Clear Choice’ which is malted from a unique variety of barley which is free from the class of polyphenols which help form haze complexes. For an easy option at the small scale this could be something to consider.
Body
One of my earlier posts covers the various ways you can control the body of your beer. There’s no point repeating all that here just head to my post on bodybuilding. Suffice it to say that wheat and oats are again good choices, and if you are making a Stout consider some Munich malt which adds both body and some lovely complexity to the malt base.
Colour
Clearly the range of differently roasted malts offer a full palate of colour options for your beer. But what if you want to add the colour without the flavour? Here I’m thinking about something like a Red Ale or a Black IPA. Here Black Malt is your friend, but don’t add it to the mash, spread it over the top of the mash bed just before you start sparging – in this way you get a lot of the colour and very little of the flavour extracted.
Another related trick is needed if you want to make a lager that looks and tastes like it has been made via the traditional decoction method, but when you don’t have the kit or the patience to use this approach. The boil stage of decoction promotes the Maillard reaction yielding melanoidins. A similar effect can be achieved used a small proportion (2%) of Melanoidin malt within your malt bill. Here the melanoidins have been formed during the roasting process
Finally, if you want to get the colour and flavour from a roasted malt without the astringency then consider some dehusked malt such as one of the Carafa Special grades from Weyermann or Blackprinz from Breiss. Many of the polyphenols in barley is within the husk, if it’s not there it cannot impart the astringency. Also important with a stout is to get your pH right by adding some bicarbonate to a Stout Grist to keep the pH up to around 5.4. Dark roasted malts, rich in acidic melanoidins will reduce the pH in the mash and reduce your extract efficiency unless you correct for this.
Sweetness
Crystal / Cara malts are made via a different process to regular malts. Rather than being drying directly after malting, they are heated to a comparable temperature in a sealed drum so that they are ‘stewed’ before drying and roasting. This starts the saccharification process and the sugars become caramelised during the drying / roasting stages. A whole range of colour options exist. The most crushable hoppy beers of today have a backdrop of subtle sweetness to bring out the best of the fruity flavours from the hop oils. Pale Cara malts (15-25 EBC) are used to achieve this. Hops might seem to win all the Oscars, but Cara malt should win a gong for the Best Supporting Role.
For malt forward beers where sweetness is also important, some of the darker Crystal malts come into their own. These give toffee (Crystal Pale / 150) or caramel and dried fruit (Dark Crystal / 400) flavours to both traditional and modern porters and stouts. What did you think put the popcorn into Northern Monkey’s Film Club?
In everything, moderation
Finally don’t forget the most important superpower of all, and that is the enzymic power within base malts which turns the starch into sugars – the source of our alcohol. Enzymes are delicate and high temperatures denature them. Both roasted and crystal malts no longer contain functional enzymes so have no diastatic power. Thus when using these malts never use more than 10% of each and always have at least 70% of base malt within the grist. The two exceptions here are Vienna and Munich malts which retain enough diastatic power to be used at up to 100% of the malt bill, so these can be counted towards your 70% too.
More help?
Would you like a beer recipe designed for you, and even made at pilot scale for you to try? I can offer both of these services and very soon I will have the AWRS licence required for you to test out your new brew on your own customers for their feedback because launching into a full scale batch. If either of these are of interest, just give me a call.
The body of a beer makes a big difference to the drinking experience. The amount of body that you target depends on both the style and the drinking audience you are aiming for, but for an excellent beer it needs to fit the style. The beauty of the brewing process is that there are a very wide range of variables you can play with to adjust the body of your beer.
There is a view, to which I also subscribe, that the ideal craft beer will taste as if it is 5% ABV. That means that our beer design may be seeking to increase the body of a low ABV example but reduce the body in an imperial stout. It’s like going to the gym, some people are there to increase their tone and muscle bulk, others are looking to shed a few pounds.
What is body?
This is the first thing to understand, because when you, the rationale behind the process variables that influence it become clear. Predominantly the body of a beer (or any beverage) is related to the viscosity. Viscosity, for those who are interested, is the resistance to flow within a liquid. Think of water at one end of the range and honey at the other. Other key factors that influence how we perceive the body of a beer are the sulphate:chloride ratio and the level of carbonation. These factors are important but are secondary to the viscosity.
So what influences the viscosityof beer?
Simple, the higher the amount of dissolved solids and the higher the molecular weight of those solids the higher the viscosity of the beer. Considering a 4.4% European Pilsner for example; we would expect around 3% unfermented sugars and 0.3% protein to be the major dissolved solids. It is worth remembering that the molecular weight (MW) of the proteins present could easily be 10-20 times higher than the unfermented sugars, so their effect will be higher than their concentration seems to suggest.
INCREASING BODY
We could simply increase the ABV, because as this rises so does the total sugar content of the wort. Whilst the relative percentage of unfermentable sugars remains the same, their absolute level rises. Thus the higher body we generally experience in stronger beers.
But let’s say we are looking to make a session beer at 3.7% but we don’t want it to taste watery, what options do we have?
Careful choice of the malt bill
Add an adjunct that contains higher molecular weight proteins
Select the best mash temperature
Consider a step mash
Use a lower attenuation yeast
Use a lower sulphate:chloride ratio in your brewing salt addition/s.
Add lactose
Malt choice
This is one of the two most powerful tools you have open to you, the other being your choice of yeast. Crystal malts are commonly used to increase the body of a beer, their unique malting process leads to caramelised sugars being present in the malt itself. If you don’t want to also add strong flavours then choose a lightly kilned version – often called Cara malts, these will add a little sweetness but not the stronger caramel or dried fruit flavours of the darker crystal malts. Note that crystal / cara malts have a very low enzymic potential so should only be used at < 10% of the total malt bill. Another option is Munich malt but this has a higher flavour potential so is often best used in darker beers where it’s maltiness will be a welcome layer of flavour rather than a distraction.
Lower Attenuation Yeast
An alternative to putting more body in is to take less out! Lower attenuation yeasts such as Fermentis S-33 or Lallemand BRY-97 are more selective in the sugars they convert and thus leave more behind the final beer. If you use one of these you may want to do something counter-intuitive with your mash temperature so your final gravity is not too high and that is to mash in at a lower temperature (i.e. 65 C).
Adjuncts
It is common to add oats or wheat to increase the body of the beer. Be careful with the level you use though. Both adjuncts contain larger molecular weight proteins, some of which will be left, like a sludge, in your mash tun. High levels will also lead to a lack of haze stability, which can be a problem or an advantage depending on the style you are aiming for. Oats also add beta-glucans and other viscous polysaccharides to the beer, but if you add too many, the viscosity of your mash will rise and increase your sparge / run off times or may lead to a stuck mash. The lack of husk on malted wheat can also lead to similar problems albeit via a different route. If you are using as mash tun, then add your wheat to your grist hopper towards the end so the wheat does not sit directly above the plate.
If your brew kit allows for a step mash, then it is possible to extract more of the medium molecular weight proteins from these adjuncts by including a protein rest. This breaks down the problematic high MW proteins (less sludge) to form more of the ‘body building’ medium MW proteins which are wanting to move forwards in the process.
Mash temperature
A subtle change here can have a significant effect on your final beer. You have competing enzymes in your malt and at higher temperatures α-amylase wins out leading to a higher level of more complex, lower fermentability sugars and with this, more body.
Adjust your brewing salts
Higher relative levels of chloride in a beer are known to increase the perceived body. With something like a Stout you would want higher chloride levels anyway to bring out the lovely malt flavours. A less obvious example of this approach is with NEIPA’s. Whilst these beers have a very high hop level, the style demands a lower bitterness and also uses low colour malts so there is little or no malt character to be enhanced. NEIPA’s are commonly made with a 1:2 – 1:3 sulphate:chloride ratio.
Add Lactose
Finally, you could simply add a non fermentable sugar to build you body, an approach traditionally used with a Milk Stout. Lactose is a lot less sweet than sucrose but is sweet nonetheless, so be cautious in the amount you add if you take this route, start with something in the 3-7% range.
REDUCING BODY
If you are one of the mega brewers then one of your aims is to make a lager which is easy to drink, something with less body that you would expect for the ABV. This is one of the reasons why Budweiser is made with some rice within the malt bill. If you are reading this you are probably not seeking to make the next Bud Light, but the same principles apply. A beer whose body is too high is less satiable; it is something where a half might be enough. If you want to make a high ABV beer more session-able, what options do you have open to you?
Add an adjunct
Select the best mash temperature
Use a higher sulphate:chloride ratio in your brewing salt addition/s.
Add an adjunct
Mash adjunct
There is no shame in using some rice within your malt bill. But you need to use it in the right form and at the right level. It is necessary for all starch sources to gelatinise (hydrate and open up ready for the enzyme action) and is it really handy that malted barley does this between 61-65 C so this happens without you having to think about it. Rice however requires 70-80 C. Mega-breweries have a separate vessel for this step, but as a micro-brewer you can buy Flaked Torrified Rice which has been ‘pre-gelatinised’ and is ready to charge into your mash tun. Something else to note is that rice has no enzymic power and very low FAN (link to definition), so needs to be partnered with barley malt to enable saccharification and yeast health. Keep the level below 25%.
Kettle adjunct
Rice lowers body because it produces a much higher percentage of fermentable sugars than malted barley. Another approach to achieve this would be to add simple sugars directly into the copper. This is the approach used by the Belgians to make beers North of 10% ABV which do not feel like treacle. Sugar syrups, candy sugar and honey are all options. These are 100% fermentable so give you alcohol without the body.
Mash temperature
The opposite approach to body boosting applies here of course and that is to aim at a lower mash temperature to favour β-amylase and thus gain a higher proportion of fully fermentable maltose.
Adjust your brewing salts
Here your exact approach will depend on the style you are aiming for. You want to increase the sulphate:chloride ratio but the extent will depend on the style. For a malt forward beer you are likely to want to keep a modest excess of chloride – say 1:1.25 but for a double IPA you be be free to go for 3-4:1. Here you are looking for a subtle malt backbone at most and are likely to want the bitterness to balance well with what is likely to be a higher level of background sweetness.
Final comments
A commercial beer design needs to both good to drink and practical to manufacture. As you have now seen we have plenty of factors at our disposal. Which we choose to use will depend on the style being targetted and capability of the brew kit we have at our disposal. If you are want some guidance with beer design, or help with practical processing problems then please give me a call and we can arrange a phone/video consultation or, if you are based in the North West of England a site visit.
Understanding and controlling the water chemistry of your brewing liquor is essential to making excellent beer at high yields.
Step back 150 years and the reason why some water sources gave better beer at better yields was simply not understood. Certain cities became famous for the beers which worked out best with their water. Through a process of trial and error, brewers worked out which beer styles best suited the water they had available to them. London was noted for its’ Porter, Burton-on-Trent for pale hoppy beers (in those days meaning bitter rather than rich with hop oils), Dublin for Stout, Pilsen and Budweis for pale lagers and so on. In was only in 1850’s that a Dr Sheridan Muspratt speculated that the gypsum in Burton well water is what made it special. We had to wait until the early 20th century before the full picture emerged and showed the importance of Calcium (Ca2+), Magnesium (Mg2+), carbonate (CO32-) sulphate (SO42-) and chloride (Cl–) ions across multiple stages of the brewing process.
Some people think of water chemistry as too complicated and simply ignore it, but that approach means that both the brewer and the drinker miss out on a wide range of benefits from designing their brewing liquor composition correctly. So what are the main benefits?
The pH in the mash is critical* and this is influenced by the alkalinity of the water which is increased by carbonate, but reduced by Ca2+ and Mg2+ ions {via the precipitation of Ca / Mg phosphate salts resulting in the release ofhydrogen ions (H+)}
*In the mash you are using the power of enzymes such as α and β amylase to break down the barley starch into sugars. Enzymes are very sensitive to their environment, they work best within tight pH, temperature and reagent concentration windows.
α-amylase is stabilised by calcium ions, and thus more long lived and effective when they are present at a sufficient concentration.
Together this means that you will get a better extract yield with the correct calcium concentration in your brewing liquor. Darker beers need more calcium to compensate for their lower enzyme level too.
Yeast health and flocculation is aided by calcium ions.
We now know that it is not simply sulphate, but the sulphate to chloride ratio which is important in beer. This impacts which aspects of the beer are most prominent to the palate of the drinker. They are perhaps best thought of as seasoning. A high sulphate:chloride ratio (say 3:1) will express the bitterness where as a low sulphate:chloride ratio (say 1:2) will bring out the malty flavours.
The great news is, now that we understand the impact of water chemistry, we should be able to brew excellent beers of almost any style anywhere in the world simply by adding or removing the desired ions from the water to meet our needs. So now know the most significant benefits, what are we going to control and how are we going to do it?
Step 1 – understand the composition of your incoming water.
The best option is to have your water analysed for its “mineral” (dissolved ionic salts) composition. If you are using spring or well water this will be your only option. If you are buying a significant amount of brewing products from Murphy’s & Sons they will happily analyse your incoming water once a year for free. If not they offer this as a paid service for around £30. A very worthwhile investment.
If you are using mains / municipal water, another option is to search for the website of your local water company, most of them publish the ‘average composition’ of the water they provide by postcode. Expect water from rainwater catchment to be low in Ca and other dissolved salts, but ground water to be rather higher because of the salts dissolved from the rocks it has passed through.
Look out for elevated levels of Fe (> 0.5 ppm), Cu ( > 0.5 ppm), Mn (> 0.1 ppm) or nitrate (> 10 ppm) in your water too. If they are above these levels they will cause you flavour issues from day one, reduce your shelf life and impact your yeast health. If present at elevated, you will need to install an ion exchange column or related technology to reduce their level/s.
Step 2 – decide your ideal calcium, sulphate and chloride levels for the beer style
Style
[Ca] / ppm
Alkalinity
(as ppm CaCO3)
[SO42-]
[Cl–]
SO4:Cl
Pale lager
50-75
0-40
0-150
50-100
1:1
Pale Ale
50-100
0-80
50-150
50-100
2:1
Amber Ale
50-150
80-200
50-150
50-150
1:1
Stout
50-75
80-160
50-150
50-150
1:2
They are quoted as ranges because (i) you usually have to work within the constraints of your raw water, which will already contain some of these ions, and (ii) you may need also to reduce the alkalinity of the water by the addition of calcium sulphate / chloride (see step 3). In most cases it would be impossible to hit precise values for all these aspects; fortunately experience shows that it is not necessary to be that precise.
Step 3 – calculate the total and residual alkalinity of your water.
Look for the ‘total alkalinity’ TA value (quoted as ppm CaCO3), Ca and Mg levels in your water report. From these you can calculate the residual alkalinity RA you would expect in your mash.
RA = TA – ([Ca in ppm] / 1.4) – ([Mg in ppm] / 1.7)
Using this equation, check whether, with your first approximation of your planned calcium level, whether your RA will fall into range. If not, will it come in range if you increase the Ca level to near the top of the desired window? If the answer is still no, which is likely to be the case if you are making a Stout with soft water for example, then you will need to add some sodium bicarbonate (NaHCO3) to increase the alkalinity without changing the calcium level. Experimental studies show that for every 10 ppm you want to increase the TA (in ppm CaCO3 equivalent) you need to add 17 ppm NaHCO3.
Step 4 – calculate the ratio of CaSO4 to CaCl2 you need to use.
The calcium that you add can be in the form of the sulphate or the chloride. Brewing textbooks will take you into the unique realm of milli-equivalents. But since I was a chemist before I was a brewer I’d suggest it’s easier just to look at the mass of each anion (sulphate or chloride) you want to use and calculate how much calcium this contributes. If you build a simple spreadsheet based on the following compositions / assays of the brewing salts it is quick and simple to adjust the levels iteratively until you get both your SO4:Cl ratio and [Ca] into range.
Salt
[Metal ion] / % w/w
[Anion] / % w/w
CaCl2.1.84H2O§
28.3
48.7
CaSO4 (gypsum)
29.5
70.5
MgCl2.6H2O§
12.0
34.9
MgSO4 (Epsom salts)
12.0
47.2
NaCl
39.3
60.7
§Commercially available chloride salts are hydrates, they contain a small amount of water chemically bound within the structure. 77% CaCl2 is the hydrate shown above. For simplicity in the main text I have not included the waters of crystallisation in the formulae.
I have included sodium chloride (NaCl) and the two magnesium (Mg) salts here too. If you have water which is already naturally high in calcium, it may not be possible to balance the SO4:Cl ratio without exceeding the desired total calcium level. In such cases you can add the required anion as the magnesium or sodium salt thus leaving the calcium level unchanged. Do note though that you should not exceed 100 ppm Na (starts to taste salty) or 15 ppm Mg (becomes a laxative!) if you do need to use these.
Worked example
We want to make a hop forward blonde ale…
Step 1 – find out the quality of the raw water
We get the following analysis back on the quality of our incoming mains water:
Component
Concentration
Alkalinity (TA)
140 ppm as CaCO3
Ca
80 ppm
Mg
3.2 ppm
Na
10.6 ppm
SO4
120 ppm
Cl
23 ppm
Step 2 – decide the ideal water profile for what we are making
For a hop forward blonde ale we would ideally required:
Component
Concentration
Alkalinity (RA)
50-100 ppm as CaCO3
Ca
50-100 ppm
SO4
50 -150 ppm
Cl
0-100 ppm
SO4:Cl
2:1
Since we want to make a hop forward style we will malt to suppress the malt flavours to showcase the hops so we would look for a high SO4:Cl ratio, let’s assume we aim for 2:1. Also let’s clarify here, this is the ratio of the weight of sulphate to the weight of chloride, it’s as simple as that (no reason to be thinking about moles or milli-equivalents)
Step 3 – Calculate the residual alkalinity (RA) at the desired [Ca]
The calcium level in our water is already within the desired range, so we would calculate the RA based on the raw water itself.
RA = TA – ([Ca in ppm] / 1.4) – ([Mg in ppm] / 1.7)
RA = 140 – (80 / 1.4) – (3.2 / 1.7)
RA = 79.7 ppm as CaCO3
This too falls within our target range.
Step 4 – calculate the ratio of CaSO4 to CaCl2 you need to use.
The level of sulphate in our water is already high but the chloride low, the ratio of SO4:Cl being 5.2:1. Thus we are going to need to add a chloride salt to reduce this ratio. We have two options, we could add CaCl2 to get our 2:1 ratio but the resultant [Ca] would then be 101 ppm and the new RA = 66 ppm as CaCO3. The Ca level would be only just outside the desired range so that would probably be acceptable. Another option would be to add the chloride as NaCl which would leave the [Ca] and RA unchanged. Let us look at how we calculate this addition.
Desired [Cl] = 60 ppm
Current chloride conc. = 23 ppm
Need to increase [Cl] by 60 – 23 = 37 ppm
Using the table above we note that NaCl is 60.7% Cl so the additional [NaCl] required to achieve this is:
37 ppm / 60.7% = 61 ppm NaCl
Finally let’s check that this does not take the total [Na] above 100 ppm.
Na contribution from 61 ppm NaCl
= 61 x 39.3% Na
= 24.0 ppm Na
Total [Na] = contribution from raw water plus contribution from added NaCl
= 10.6 + 24.0 = 34.6 ppm.
So we have our answer, because we already have a gypsum rich water supply we need only add 24 ppm, or 24 mg per litre, of NaCl to get the ideal brewing liquor for our blonde ale.
If you would like more help with water chemistry, contact me and we can look at it together.